Content Menu
● Introduction to Swimwear Alterations
>> Why Alter Swimwear?
● Materials Needed
● Understanding Underwires
>> What is an Underwire?
>> Types of Underwires
● Preparing Your Swimsuit
>> Choosing the Right Swimsuit
>> Measuring and Marking
● Adding the Underwire
>> Step-by-Step Instructions
● Final Adjustments
>> Trying It On
>> Making Adjustments
● Tips for Success
● Conclusion
● FAQs
>> Can I add underwire to any swimsuit?
>> Is it difficult to sew an underwire into a swimsuit?
Learn the secret to transforming your swimsuit with underwire support in this step-by-step guide for a perfect fit!
Adding underwire to a swimsuit can enhance support and shape, making it more comfortable and flattering. Whether you're modifying an existing swimsuit or creating a new one, this guide will walk you through the process.

Introduction to Swimwear Alterations
Welcome to the fun world of swimwear alterations! Have you ever thought about making your own swimwear? With DIY swimwear, you can create unique pieces that fit you perfectly. It's an exciting way to show off your style and creativity. Whether you want a swimsuit that hugs your body just right or one that stands out with cool designs, altering swimwear can help you achieve that.
When you think about custom swimwear, imagine taking a plain swimsuit and giving it a personal touch. Maybe you want to change the color, add some fun patterns, or even adjust the fit so it feels more comfortable. By sewing swimwear, you can make it exactly how you want! Plus, you can learn new skills along the way. So grab your sewing kit and let's dive into this exciting adventure of swimwear alterations!
Why Alter Swimwear?
Altering swimwear brings lots of benefits. The most important one is getting a better fit. Sometimes, swimsuits that look great on the rack don't fit quite right once you try them on. By making some adjustments, you can create a swimsuit that feels great and looks awesome on you.
Another reason to alter your swimwear is to create something unique. You can mix and match fabrics to design a swimsuit that no one else has! This way, every time you hit the beach or the pool, you'll know you're wearing something special.

Materials Needed
1. Swimsuit: Choose a swimsuit that you want to modify. It should have enough fabric and structure to accommodate the underwire.
2. Underwire: Select the right size and shape for your bust. You can purchase underwires from sewing supply stores or online.
3. Underwire Casing: This is a fabric tube that holds the underwire in place. It should be slightly longer than the underwire itself.
4. Sewing Machine: A machine with a zigzag stitch option is ideal.
5. Thread: Use a thread that matches your swimsuit fabric.
6. Scissors: Sharp fabric scissors are essential for clean cuts.
7. Pins: To hold the fabric and casing in place while sewing.
8. Measuring Tape: For accurate measurements.
9. Chalk or Fabric Marker: To mark the placement of the underwire.
Understanding Underwires
Underwires are special pieces that help give support to swimwear. If you've ever worn a swimsuit with an underwire, you know how important they can be for comfort and style. They help the swimsuit hold its shape and keep everything in place, making it easier for you to enjoy your time at the pool or beach.
What is an Underwire?
An underwire is a small, curved piece of material that you find sewn into the fabric of some swimsuits. It is usually made of plastic or metal. The main job of the underwire is to support the bust area. This means it helps lift and shape, so you feel secure and confident while you swim or play in the water.
Types of Underwires
There are different types of underwires you can use in swimwear. The most common types are plastic and metal. Plastic underwires are lightweight and flexible, making them a good choice for swimsuits that you want to be comfortable while swimming. Metal underwires, on the other hand, are sturdy and provide more support. It's important to choose the right type based on how much support you need and what feels best for you.
Preparing Your Swimsuit
Before you can add underwire to your swimsuit, you need to prepare it properly. This step is crucial for making sure the underwire fits well and gives you the support you need. Let's explore how to get your swimsuit ready for this fun DIY project!
Choosing the Right Swimsuit
First, you need to pick a swimsuit that is suitable for adding underwire. Not all swimsuits work well with underwire. Look for one that has enough space in the cups. This will help the underwire sit comfortably and not poke you. Swimsuits made from stretchy material like spandex or nylon are great choices. They can hold the underwire snugly and still feel comfy when you wear it.
Measuring and Marking
Once you have your swimsuit, it's time to measure and mark! Start by putting on the swimsuit and figure out where you want to place the underwire. Use a fabric marker or chalk to make small marks on the inside of the cups. Make sure the marks are even on both sides. This will help you know exactly where to sew the underwire later. It's important to measure carefully, so the underwire will fit just right!
Adding the Underwire
Now that you have your swimsuit ready, it's time to learn how to add underwire to a swimsuit. This step is important because the underwire gives your swimwear support, making it more comfortable and flattering. Let's go through the steps together!
Step-by-Step Instructions
Step 1: Prepare the Swimsuit: Lay the swimsuit flat and use the measuring tape to determine where the underwire will be placed. Typically, it should sit just below the bust line.
Step 2: Mark the Placement: Use chalk or a fabric marker to draw a line where the underwire will be inserted. Ensure it's symmetrical on both sides.
Step 3: Cut the Casing: Cut the underwire casing to the appropriate length, leaving a little extra on each end for adjustments.
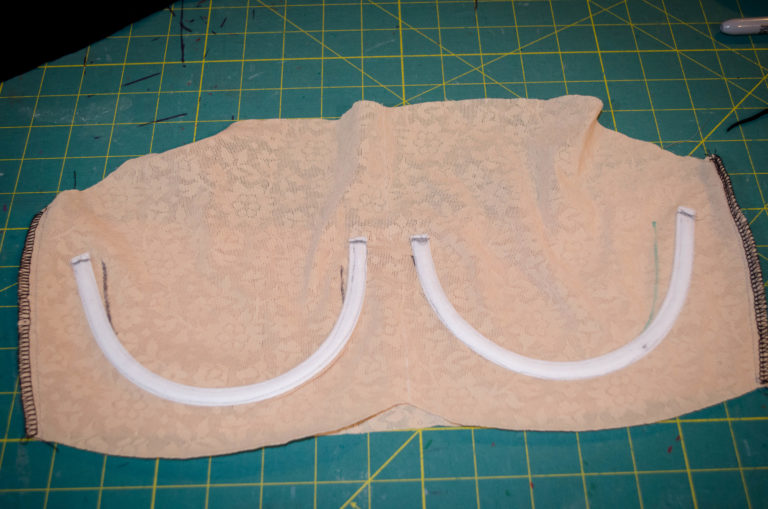
Step 4: Insert the Underwire: Slide the underwire into the casing, ensuring it fits snugly but can move slightly for adjustments.
Step 5: Attach the Casing to the Swimsuit: Pin the casing along the marked line on the swimsuit. Make sure it's aligned properly and securely pinned.
Step 6: Sew the Casing: Using a zigzag stitch, sew the casing onto the swimsuit. Start from one end and sew along the entire length, ensuring the underwire stays in place.
Step 7: Secure the Ends: Sew the ends of the casing shut to prevent the underwire from slipping out. Reinforce with a few extra stitches if necessary.
Step 8: Try It On: Try on the swimsuit to ensure the underwire is comfortable and provides the desired support. Make any necessary adjustments.

Final Adjustments
Now that you've added the underwire to your swimsuit, it's time to make sure everything fits just right. This part is super important because you want your custom swimwear to be comfortable and look great!
Trying It On
The first step in the final adjustments is trying on your swimsuit. When you put it on, pay attention to how it feels. Does the underwire provide good support? Are there any areas that feel too tight or too loose? Make sure to move around a bit, like bending or stretching. This will help you see if the swimsuit stays in place and feels comfortable, just like it should.
Making Adjustments
If you notice anything that doesn't feel right, now is the time to make adjustments. Maybe the underwire is poking you, or perhaps the fabric is bunching up. You can fix these little issues by adjusting the seams. For example, if the fabric is too tight, you might want to let out a seam. If it's too loose, you can take it in a bit. Remember, it's all about creating that perfect fit for your swimwear alterations!
Once you've made your adjustments, try on your swimsuit again. Keep repeating this process until you feel happy with how it fits. With these final adjustments, your custom swimwear will be ready for fun in the sun!
Tips for Success
◆ Choose the Right Underwire: The underwire should match the natural curve of your bust for maximum comfort.
◆ Use Stretchy Thread: This helps maintain the elasticity of the swimsuit fabric.
◆ Reinforce Stress Points: Areas where the underwire ends should be reinforced to prevent wear and tear.
Conclusion
Making your own DIY swimwear can be a fun and creative project! By learning how to add underwire to a swimsuit, you can create custom swimwear that not only fits you perfectly but also gives you the support you need. Remember, sewing swimwear allows you to express your style and ensure you feel great when you hit the beach or pool.
As we explored, understanding the types of underwires and how they help with swimwear support is key. Whether you choose plastic or metal underwires, each type offers different benefits that can enhance your swimsuit. Preparing your swimsuit properly, measuring it right, and sewing the underwire in securely are all important steps to make your swimsuit one-of-a-kind.
Finally, don't forget to try on your swimsuit and make those last few adjustments. Custom swimwear should not only look good but also feel good. So grab your materials, follow the steps, and enjoy the process of sewing swimwear that is perfect just for you!
FAQs
Can I add underwire to any swimsuit?
Not every swimsuit can have an underwire added to it. The best swimsuits for this are usually those with a little bit of structure, like bikini tops or one-pieces that have some shape to them. If your swimsuit is very stretchy or has no lining, it might be tricky to add the underwire. Look for swimsuits that have a space for the underwire, or ones that you think could use some extra swimwear support. If you're unsure, try using custom swimwear as a guide, because they often have a place for the underwire built right in!
Is it difficult to sew an underwire into a swimsuit?
Adding underwire might sound a bit tricky, but it's really not too hard! If you follow the steps for how to add underwire to a swimsuit, you'll find it can be quite fun. Start with simple materials and sewing techniques. Just take your time, and don't worry if it's not perfect on the first try. Lots of people who do DIY swimwear are beginners at first, just like you! So grab your sewing kit, and give it a go—it's all part of the learning process!


